Page 3: Adding Points
Boolean Point

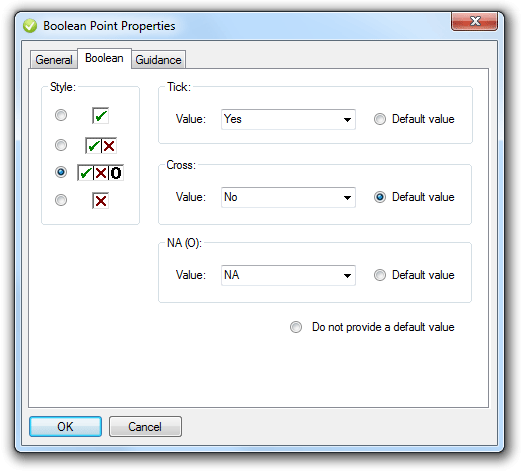
The Boolean Point is a useful facility for quick recording, providing a virtually unlimited choice of results recording, either text or numeric, see design dialogue box below. While the default choices in the drop down lists are Yes, Yes/No, True/False, Safe/Unsafe, 1/0/99 and NA/ N/A, amend for any choice. The 1, 0, 99 style is useful for collection of observations which may then be subject to statistical analysis. The standard selections can be amended to sentences and paragraphs, which can be selected and loaded into reports.

Selection Point 
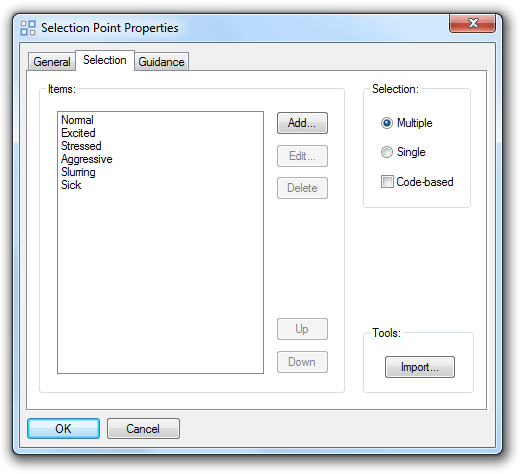
The Selection Point is particularly useful where a number of choices are presented and multiple selections may be necessary. The design dialogue box below shows potential for many Items to be presented with either Multiple or Single selection. The Items can be added, edited, deleted and moved up and down. Code-based provides the opportunity to collect numerical data or codes 'behind the scenes', eg 1;Normal, 2;Excited and so on, use the number/code first then a semi-colon (;) to separate from the text. The code value is not visible on the project page. The code-based values can be used as inputs for Math points, see below. When numeric data is used in the Selection point in Multiple selection mode the values are added when used as input to a Math point.

The Import tool facilitates the importing of content for the Selection Point, content must be sourced from a tab-delimited txt text file to import. To set a value as default in Design mode, select value and point in page view and right click mouse to 'Save Default Value'.
Right-click of a Selection point in the Design window, presents the Convert to Drop Point option to create an equivalent Drop List point (see below), with the same characteristics. Similarly, a Drop List point can be converted to a Selection Point.
Edit Point 

The Edit Point is used for entering text and/or numbers in the field. Standard Cut / Copy / Paste commands can be used, and Bar Code and RFID (radio-frequency identification) are accepted. The design dialog box below shows the Style options for text and numeric input and controls for Numeric Behaviour and Default Value for both text and numeric data. If numbers only should be entered by users and then may be inputs for Math and Logic points, the style Numbers only should be selected. Style also includes an option for Masked entry of either text or numbers, for use of passwords to control visibility of pages and points (in combination with Logic point). The size of the entry field is controlled by Physical Size, from many compact inline box options to 16 lines for entry of large amounts of text. Note, in Android to scroll in multi-line Edit points, tap to show cursor and then drag the cursor to scroll.
Up and down arrows, or 'spin buttons' can be used for quick entry of numbers. A Range can be set for numeric input; however, a default value within the range must be set otherwise the out of range warning would show. In Android, to enforce the range, set 'Required' in point General Style. The Limit control enables a limit to the number of characters entered in the Edit point, this can be useful when outputting to databases and forms.
 |
Default Value can also reference the current value of other points, evaluated at session creation time. Thus the Default Value for a point can be <%OtherPointID%> ; for example, in drill hole sampling to enable 'from' and 'to' data; the referenced point should be set to 'Retain Session Value'. To record the device UnitID at session creation time the Default Value can be set to <%_UnitID%>. To record the session GUID in a data point at session creation time the Default Value can be set to <%_GUID%>.
The 'Read only value (on mobile client)' option presents data that is included at session creation on the Mobile Data Studio server, either via the Data Pathway (see Data Management, page 12) or a Local session (see page 2). This control cannot be overridden on the mobile client.
Dictation can be used for large blocks of text: in Android, iPhone and Windows 10, transcribe direct from keyboard microphone input to Edit point when connected to the Internet.
Barcode Point 
The Barcode point is introduced with Mobile Data Studio version 10. It operates with Android and Apple iOS devices. The Barcode point utilises the camera of the mobile device on which Mobile Data Studio is installed. No additional scanning accessory is required. Thirteeen types of barcode are able to be captured by the Barcode point, see image of Barcode Properties below. When applying the Barcode point in project Design, if the likely barcode types to be scanned are known, they can be selected and others de-selected to maximise barcode capturing performance.
Options for the operation of the Barcode point can be selected in project Design mode, see screenshot below. They are options for a large scan button, closure of point on capture of barcode, and tap to clear and re-scan.
Some barcodes are large and complex and may exceed the size of the data display box in the Barcode point. The data will be recorded in the session if the data string exceeds the view in the data box. To assist the user, a Layout point can be set to display the data, see string of data in red in the screen shot below. QR barcodes can include web site URL and such data can be included in a Link point, as shown below in the screenshot as 'QR Link to Web'.
Data from the Barcode point can be used to filter large datasets held in the UltraDrop point.
 |
 |
Drop List Point 
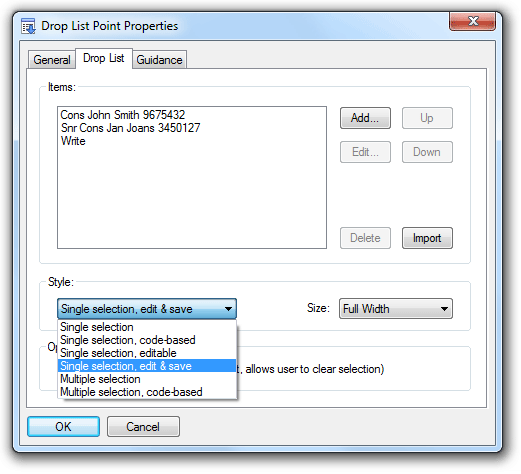
The Drop List Point is useful for long text records for both single and multiple selections. The Drop List is also a compact way of managing possible selections, with many entry box size options. The design dialog box below shows important Style options for the listing of items: Editable/edit enables additions to the Drop List on the mobile device by entry into blank areas; Save will store the new items for future use on the particular mobile device on which they were entered. This facility allows additional design specificity, and flexibility, beyond the project/application down to the level of particular users of the project. If a particular cached response needs to be removed on the mobile device, simply select it twice in a row in Android, Windows 10 and Windows Mobile, and swipe left in Apple iOS, and a prompt will appear to confirm the removal.

To generate Code-based output, place a semicolon (;) between the code and the text visible in the Drop List point. For example "150;Consulting Rate", would record 150 and make the number available for math operations.
The Multiple selection drop list enables multiple selections (including Code-based), choices are marked with a tick. Selections are recorded in data management separated by a semi-colon. Multiple selection Drop Lists cannot be edited on the mobile device.
The Import tool facilitates the importing of content for the Drop List, content must be sourced from a tab-delimited .txt text file to import. A list of hundreds of Items can be imported and scrolled for selection of choice on the mobile device. To set a value as default, select in on-page view in Design and right click mouse to 'Save Default Value'.
Where long statements are included in Drop Lists, it may assist to reproduce these in point Guidance to assist the user, or to display the selection using a Layout point (page 4).
Drop List points with more than 20 items display a Search function.
(For more advanced drop list functions, see UltraDrop point on page 5.)
Date/Time Point 
The Date/Time Point is used to record the date (and time if selected) of a particular action or observation. The Date/Time point complements the timing functions of Mobile Data Studio which always record the time and date a new session is started and finished with a project/application. The time and date recording are a reflection of the settings on the host mobile device or desktop PC. Date Format options are available for regional preferences. Date/Time point accesses the calendar functions on the mobile device and desktop PC, and can record current and other times.
On-screen, Date/Time points appear as a caption followed by a check box and date and/or time string. Tapping the check box will record the current date and/or time; controls enable alteration to date and times, either by launching a calendar or first selecting the value and using controls to make changes.
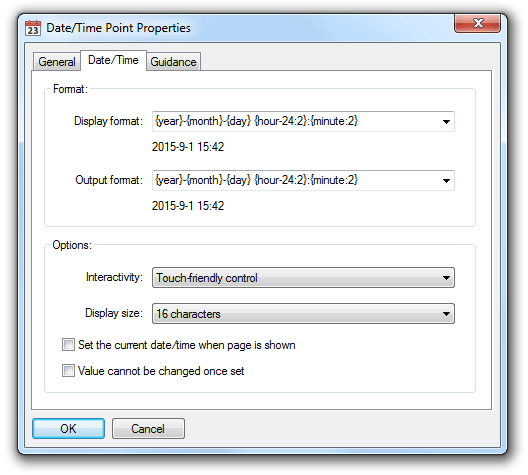
A variety of date and time formats are available, including YYYY-MM-DD, DD-MM-YYYY and MM-DD-YYYY, with day and month text, and 12 and 24-hour time with and without seconds. Both Display and Output formats can be set; for example the popular DD-MM-YYYY format might be displayed but the universal YYYY-MM-DD be output.
There are three options for control of the Date/Time point, a simple box enabling tap to set the current date and time, the 'Native' Windows control and a Touch-friendly control displaying a large calendar which is useful for devices without a stylus. Download a Date Time Test project to try out various settings to suit Android, Apple, Windows 10 and Windows Mobile devices.

The Date/Time point can be used in combination with the Math point (see below) to record time elapsed for time-based charges and other purposes. If a Date/Time point is included in a Math point's expression, the time and/or date will first be converted into a number. Where a date is included, this number will be the number of minutes since January 1st, 1970. If there is only a time, the number will be the number of minutes since midnight. When the Date/Time point includes seconds, they appear as a decimal portion of a minute in math operations (30 seconds is 0.5 minutes). Note, that when using date Maths and exporting to databases and spreadsheets, it is best to use the universal YYYY-MM-DD date format. Dates presented in other formats may not be interpreted correctly. Download a Days Calculator demonstration project to see how the Math point interrelationship can be used; in this example to calculate the number of days between two dates.
Interactivity:
- The Date/Time point has a mode available under Interactivity: either None, or fetch calculated value from Math point.
- When this mode is used, the Date/Time point always fetches its value from the nominated Math point.
- The Math point can be used to perform arbitrary calculations, possibly but not necessarily based on a source Date/Time point.
- The example Interactivity project available by download below has two pages demonstrating this, one calculating a new date 3 days ahead, and another calculating a new time 1.5 hours ahead.
- Noting again that when a Date/Time point is referenced in a Math expression, its value is the number of minutes since the start of 1970.
- Six new functions have been added to the Math point: YEAR(), MONTH(), DAY(), HOUR(), MINUTE() and SECOND().
- When applied to a Date/Time point value, these extract the field of interest. Download an example Math/Timeproject with a final page that demonstrates this.
Math Point 
Math Points allow a project to evaluate equations, drawing input from other data input points including Boolean, Selection, Edit, Drop List, UltraDrop, Logic, Date/Time, and Math points themselves.
On-screen, Math points appear identical to Edit points, but are read-only. The value will be computed automatically. The result calculated and displayed in a Math point is recorded in session data.
Each Math point has a fixed expression associated with it that it will evaluate to produce a result. These expressions can include 30 mathematical Operators and Functions, some of which are shown in the dialogue box image below.

Mathematical operators, in order of precedence:
-
^ power
-
* multiply
-
/ divide
-
% modulus
-
+ add
-
- subtract
Conditional operators, in order of precedence:
-
= equals
-
!= not equals
-
> greater than
-
< less than
-
>= greater than or equal to
-
<= less than or equal to
Logical operators, in order of precedence:
-
& and
-
| or
-
?x:y If/Else
Functions take the form fn(x), where fn is the function name and x is an expression. Functions are:
-
abs absolute
-
inv inverse
-
int integer
-
sqrt square root
-
log10 log
-
ln natural log
-
exp exponential
-
sine
-
cosin cosine
-
tan tangent
-
arcsin asin
-
acos arccosine
-
arctan atan
-
deg2rad convert
-
rad2deg convert
-
random int irnd
-
random float frnd
Values from other points on the page (or indeed any other page in the project) can be used in the expression by including the ID Name of the point. Note that referenced points must contain numeric data; however, this can be in code-based format. Points that are blank (ie points that have not been filled in) will be treated as numeric zeros.
For example, an expression to add the values entered into two other points named A and B would simply be "A+B". While this is a simple case, more complex expressions can easily be constructed, involving fixed constants and brackets. For example, to take the average of three points named Alpha, Beta and Gamma: "(Alpha+Beta+Gamma)/3". The dialogue box below shows another example, and the drop down selection facility to import points into a math equation. Practice the Math point to experiment with it's power and versatility, confidence will soon develop to apply it to many valuable projects. The Field Service Report and Sales Force projects included in the Examples folder of Mobile Data Studio software (C:\Program Files (x86)\Mobile Data Studio\Examples) make use of the Math point in preparing invoices for services and products. The screen shot below is of the Cleaning QA example project where Math expressions adjust for scoring where some scoring items are not used; necessary for scoring 'checklist' type projects.

The syntax for the If/Else logical operator is (conditional expression) ? (true expression) : (false expression). The brackets are not necessary, and any of the three expressions could be constants or variables or more complex compound expressions. The If/Else operator group has the lowest precedence. For example if there is a point 'INPUT', and the objective is to create an expression that is equal to INPUT squared if INPUT/2 is greater than 5, or INPUT cubed if INPUT/2 is less than or equal to 5, write: ((INPUT/2)>5) ? (INPUT^2) : (INPUT^3).
Random function irnd(x) generates a random integer between 0 and x-1 (meaning that there are x possible values); frnd(x) generates a random decimal between 0 and x inclusive (it could be, eg 2.456).
A full range of Decimal and Hexidecimal Accuracy control is available. There is support for non-English locales, as determined by hardware system settings (Settings > System > Regional Settings on mobile device and Control Panel > Regional Settings on desktop PC). Thus if Regional Settings specify "," as the decimal character and "." as the digit grouping character (which is opposite to the English system), then these settings will be reflected in Mobile Data Studio.
The Link point URL Schemes function (page 4) can transfer Math point data between multiple sessions, for example cumulative costs or other measurements. Download an example URL Math Sessions project which opens a new session and transfers previous total to next session, per mds:///new/session?project=Math_Sessions.ppc&values={"OldData":"<%Math2%>"}.
If Windows is not correctly 'rounding' for Integer Accuracy, wrap the whole Math point Expression with int( ).
Numpad Point 
The Numpad numeric keypad enables rapid entry of numbers using fingers rather than stylus. Numpad points are convenient inputs for Math points. Tap pad icon to launch Numpad. To support international use, in Design the Numpad has an option for Decimal character, based on either Auto (device settings), period/full stop, or comma. The Numpad point has a control in Design mode to set the range within which data can be collected, and to limit the digits in the number. Note that a period/full stop, or comma, is regarded as a digit; thus five digits could be 45.76.
 |
 |
If the recording of data within a range is imperative and users are likely to enter data direct to the point display box, enforcement of the range can be done by making use of the point 'Required' control.
 Previous Page Previous Page
|
Jump to page: |
Next Page 
|
